Labels

Wednesday, November 15, 2017

Patti Pocket Skirt


Disclaimer: I was a pattern tester for Amy and received the pattern for free, but below are all my own honest opinions.  

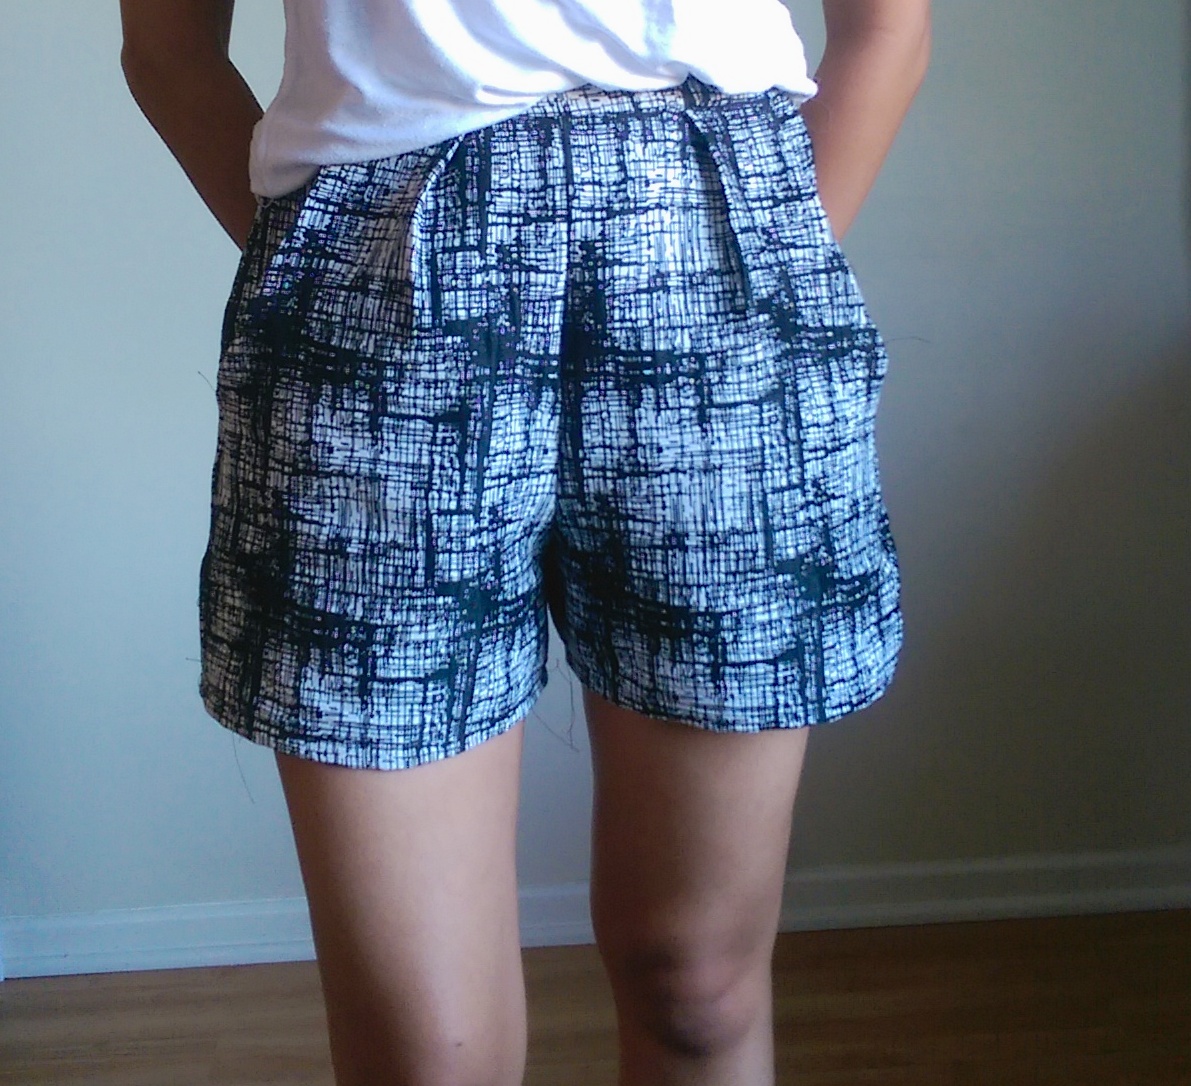
In the past, I have discussed my obsession with pockets, especially in dresses and skirts. So imagine my excitement when I got to test a pattern with "Pocket" in the name! Like really, leave your purse at home, cause you could fit your life in these pockets. Most dress/skirt styles have a hidden seam pocket (that is if they are lucky enough to have pockets at all), so it's really refreshing to have the pockets front and center like the all-stars they are.

Style

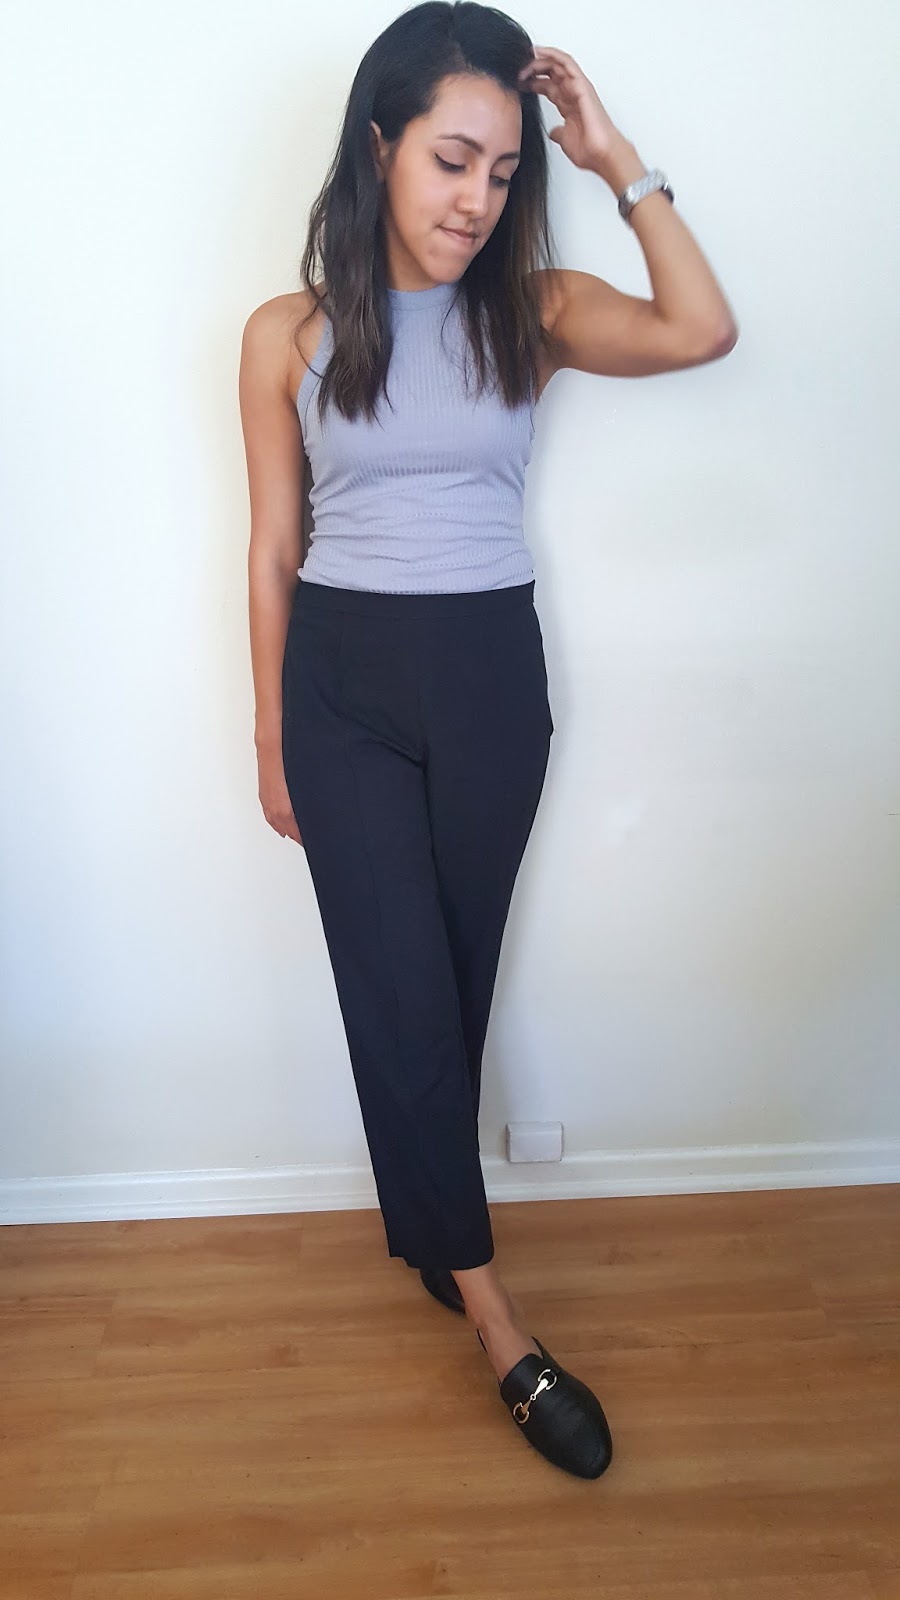
I wouldn't say that this skirt especially speaks to my sense of style, but it is a design that can easily find a place in any wardrobe, with the right details. Here I've tried to make the skirt look a little less "sweet" by pairing it with stripes, a chain necklace, and leather-look booties. Another plus is the versatility of the original design. I have also paired my Patti with a simple top, cardigan, and tights for a more work appropriate look.

There are is a lot of easy options for making unique versions of this skirt as well. Since I was pattern testing, I decided to go with a straight forward interpretation in a simple fabric. For future makes I would really like to play with the shape of the pockets, and maybe add some piping to highlight the lines. I'm not great at mixing prints, but I think there is also a lot of mixing and matching fabric potential.

Fit

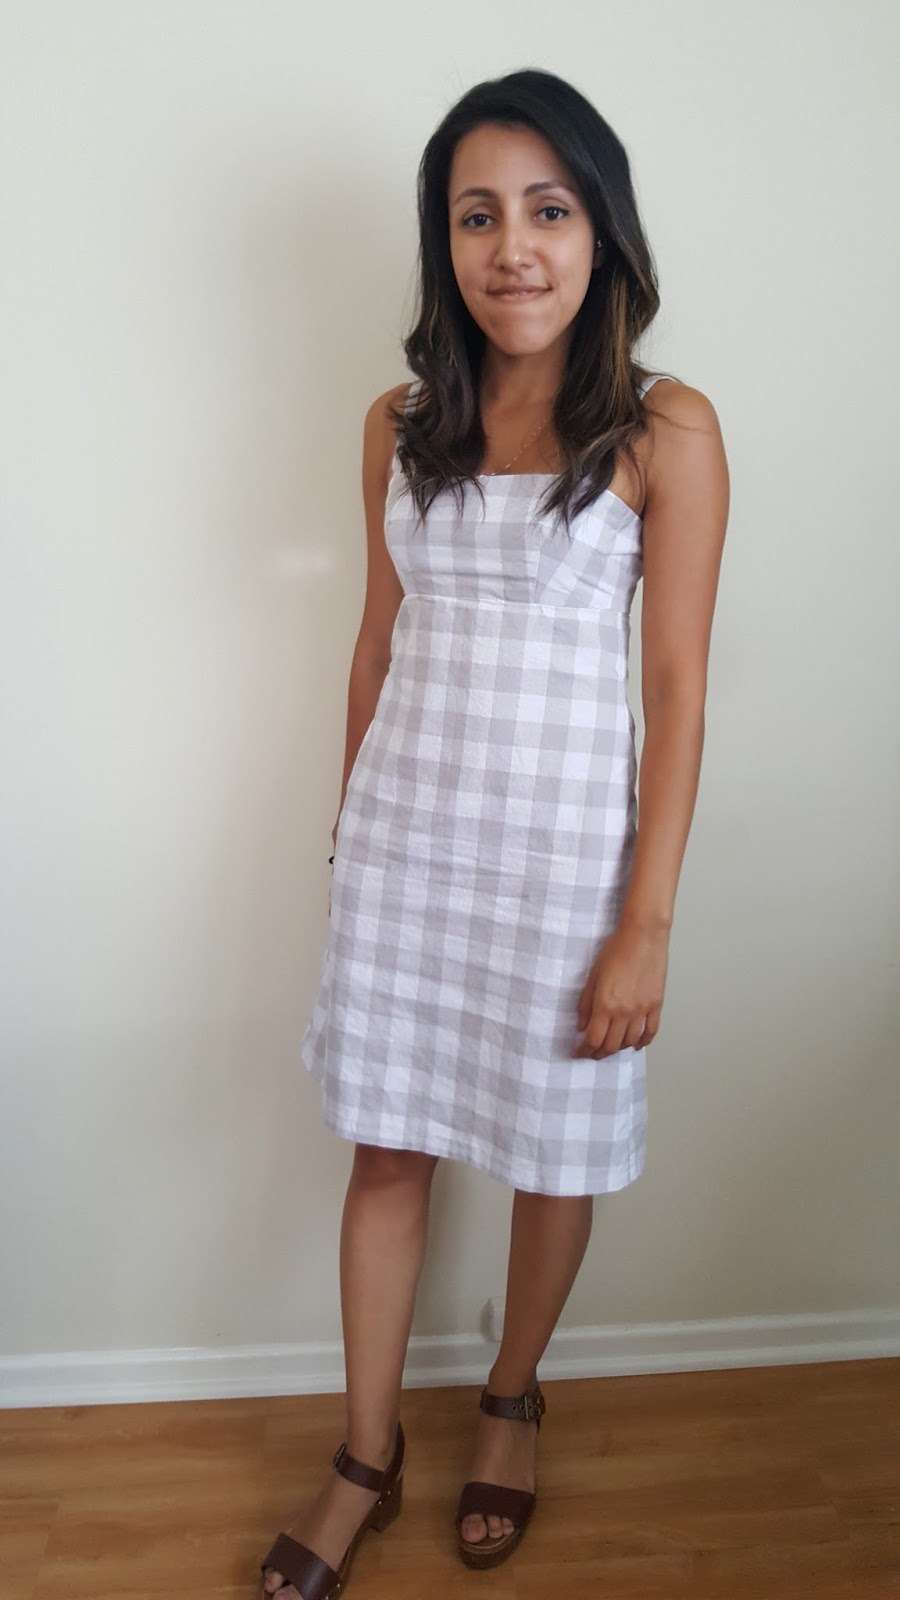
Finally a pattern just for petites! On bottoms patterns, I always end up removing at least 3-6 inches, which can sometimes cause proportion issues in addition to being annoying. I did not have to make a single length adjustment on this pattern and it was glorious. (Average/tall sewers use caution, if its perfect on someone 4'11", it may be a little too short for comfort as is.) I have only made View A (mini version), but I expect the midi version is also well proportioned in length. I made size 2, and it fit well when I put it on in the morning, but I tend to expand A LOT throughout the day, so next time I may let it out just a little bit. The generous pleats are really handy for waist fit adjustments as long as you cut your waistband long enough.


Pattern Review

The pattern itself is good, but the instructions really stand out! Firstly, the instructions and images are clear and easy to follow with nice easy to read text. I like setting my instructions next to my machine as I sew, so its nice to be able to read without picking holding them up.  Amy included a lot of really cool features in her instructions that I haven't seen before. In a lot of the images she included color coded stitch lines to show the stitches you are currently on, and the ones you had just done. If you read the instructions as a PDF, you can also use interactive features, like selecting and jumping to various sections as well as links to supplemental materials if you need a little extra help with certain techniques. I actually like to print my instructions, but I love to see sewing tools and techniques using technology. One last feature is the "Cheat Sheet," which is one page that contains an abbreviated version of all steps without images. I wasn't able to utilize it with my first make, but I can absolutely see it being useful for a more advanced sewist or after you have already made a couple and only need a simple prompt for each step.  

One tip, that I learned the hard way, is to make sure you know which side is the "wrong" side, when using a  fabric that looks the same on both sides. If you are using a fabric without a clear "wrong" side, putting together the pocket pieces can be a little confusing if you're not paying close attention. I ended up making two left side skirt pieces multiple times until I used chalk to clearly mark the wrong side of the fabric. This was more of a personal problem, and not an issue with the pattern or instructions themselves. I probably could have avoided this if I had looked more closely at the diagrams.


Sunday, September 24, 2017

Stitched Crease Pants- Finding my Work Style

I am really trying to make more work clothes, because realistically, that's what I spend 70% of the my life in. My office is pretty casual, but I am trying to put more effort into dressing up. Dress for the job you want, right? At first I was really dragging my feet on it, I felt uninspired by workwear and was bored with the prospect of looking like a J Crew catalogue (BTW, not hating on J Crew, I actually love their pieces and really appreciate their petite sizes, I just wouldn't deck myself out in it). I looked for office outfit inspiration, but I was trying to conform myself to what I thought a professional woman was supposed to wear, instead of making my own style. I absolutely love Jean Wang's work style on her blog Extra Petite. She always looks so classic and put together, and I tried imitating her style, but I still lacked motivation to get dressed in the morning. I think the lightbulb moment was when I realized that just because I admire someone else's style, it doesn't make it my style. I decided that I needed to stop trying to fit myself into other people's style and "traditional" workwear, and really make it my own.
Top: Similar, Shoes: Target, Pants: Similar H&M


I finally found some inspiration that both fits my style and is appropriate for work. I discovered Lisa Perry during this year's most recent NY Fashion Week, and it was love at first sight. Simple styles in beautiful colors and the perfect details, like pockets in almost every dress. I doubt, that I will ever be able to actually buy her designs, but they will always have a heavy presence on my Pinterest board. For these specific pants, I took inspiration from Lisa Perry's Spring 2018 collection,and a similar pair of pants from Petite Studio. I actually had the sewing pattern for awhile, but I didn't feel excited to use it, until I saw Lisa Perry's styling.


They have a real Audrey-esque vibe, especially with the styling by Lisa Perry. They are classic and versatile, but have just the right details to keep them from being boring basics. To top it all off they are absurdly comfortable. I wore them to work with a long cardigan and T-shirt, and I felt like I was wearing pajamas all day long.


I made these pants using Burda 7123 and some beautiful fabric from The Fabric Store in LA. It was my first time visiting The Fabric Store and I immediately felt at home. It was almost as if I had curated the fabrics myself. I went there only to pick up some knit fabric for a henley for my boyfriend, and came out with 5 different cuts. I made a size bigger then I usually would, and it was the right call. I had to make some major adjustments in the length. I took off about 6 inches from the shorten/lengthen line, which worked out fine. The rise is probably a little higher then the pattern intended, but I was going for a higher waist, so it worked out for me. There is a highwaist option for this pattern, but I didn't want the extra wide waistband. The rise for that view probably would have been too high anyways so for me it all worked out.  It allowed for a looser, more comfortable fit. I already have several other variations with and without the the stitched crease. I think my next pair will be a nice wool with a checkered or plaid print. I will also try to figure out had to add some pockets.
It was really hard to get a picture that showed the stitched crease, so here is a completely random close up to show the detail. 


Wednesday, July 26, 2017

Appreciating Texture: Crosshatch Print Shorts

This fabric was love at first sight while browsing through the aisles of Fabric Planet. It is a pretty sturdy, stretchy woven fabric, so the idea of shorts instantly came to mind. The print is similar to the one I used for my matching skirt and top, but much more dramatic. Obviously I have a thing for black and white line patterns, but what really struck me about this particular fabric was the texture. All the black lines stick out a little from the white.

As someone who loves neutrals and simple silhouettes, it can be easy to accidentally create a bunch of "boring" garments. Having some basics in really simple shapes and colors is an important part of any wardrobe, but too many can create a monotonous closet. Although I would not call this print boring, but I already made two items in a very similar print style, so the texture helps it stand out among my other clothes. Using fabrics with an interesting texture are an excellent way to add unique character to your pieces while staying true to your atheistic.

I used Simplicity 1371, a Cynthia Rowley pattern which I was drawn to by the pockets. It was fairly easy to put together, but the fit was very off for me. I had to make the rise about two inches shorter (probably could have taken off another inch), and if I were to do it again, I would make the waist slightly bigger and the rest slightly more fitted. I have never graded sizes before, so that will be an adventure for another day.


Foot note: (This is a note about my shoes, see what I did there?) These are one of my favorite shoes of the summer (spring, fall, and LA winter). They are amazingly comfortable with the thick block heel and just the right height. I had been looking around for this popular style for awhile, but most had much higher heels that I knew I would not be able to wear often. They did take some breaking in, but overall not that bad. The best part is they were extremely affordable from Payless Shoes.

Saturday, July 15, 2017

Cropped Overalls


I don't think I have worn a pair of overalls since I was a kid. Not because I did not want to, but because it has been really hard to find a pair that fits and doesn't make me look 12. I was so excited when I came across SewHouse7 and their Burnside Bibs. It's a simple and sophisticated take on the childhood classic, with a lot of easy variations.

 I wore the overalls with a long lace bralette to add some contrast. I love pairing opposites in an outfit, in this case the softness of the lace with the more utilitarian fabric and design of the overalls. The bralette is also functional, it is nice and cool for the summer and of course super comfortable.

If you're looking for something similar that is ready to wear, check out some of my picks at the end of this post.


I was a little intimidated at first, because it looked fairly complicated, but I was surprised at how easy it was (once I put together the pdf pattern pieces...)! The fabric, from Jo-ann's, was really easy to work with and the perfect fabric for casual and comfortable overalls. I was able to finish it pretty quickly and with minimal use of my seam ripper. I chose the more fitted version with the zipper, and while my zipper is not invisible like it was intended to be, my motto when it comes to zippers is "better done then perfect." Only minor adjustments for fit were necessary, and when I make them again, I think I will make the bib a little shorter. Overall, for my first PDF pattern, I was pretty pleased with the experience.

Pattern: Burnside Bibs by Sew House 7
Fabric: Sew Classic Bottomweight Rodeo Cotton from Joann Fabrics


Saturday, July 1, 2017

Gingham Sundress


Gingham is everywhere this spring, and I've wanted to dive in for awhile, but I also didn't want to wear the exact same print everyone else had. I found this Steel & Cotton fabric at fabric.com, and immediately knew it was perfect for my dip into the gingham pool. I wasn't sure what to do with it, so I ordered a couple yards and hoped it was enough for whatever I decided. (It ended up being more then enough, so be prepared to see more of it soon!)


I was originally inspired by this pin on Pinterest and I knew I wanted to use this fabric for a dress with this silhouette. It was a little difficult to find a pattern, but I was able to track down this vintage McCall's pattern (3952) at an Etsy shop. I actually really liked using the junior's sizing, I only had to make pretty minor adjustments to the fit. My goal with this project was to make a light easy summer dress that I could through on for almost any occasion and still be comfortable, and I think I mostly achieved that.

(My little puppers wanted to make an appearance.)


After I started this dress, I found one that is very similar by Petite Studio NYC (linked below). I LOVE this brand and have been stalking their social media and website for awhile, but haven't quite brought myself to purchase something as the price range is a little high for me. So if anyone has tried any of their clothing, I would love to hear about it! Reformation, another brand I love but haven't purchased from (yet) also has a couple similar dresses. Overall, a super versatile dress and perfect for the summer.


I love this dress with these (faux) wood platform sandals. It feels very 90's, but still modern. These shoes from Payless shoes, they are a great price, and were immediately comfortable with no breaking in. I have narrow feet and ankles so it can be difficult finding sandals with straps that fit, but these were great. Perfect shoes if you want to add a little height without compromising comfort.

Tuesday, May 16, 2017

Culottes for Compact Heights


Recently, I have started to really get into "unflattering" clothes. It has been a slow progression from my younger days when I used clothing to make my body appear how I thought it should look, to now when I am more concerned with comfort and my own expression of style. 

Culottes for petites are one of those "unflattering" styles, but I love them! They can make you appear shorter, and hide any curves you might have, but they're so cool!  I have tried on a fair amount of culottes lately and have had no success in finding the right length for my short legs, they all either fit like regular pants, or pants that just look slightly too short, which is weird. So of course I made some, and I was pretty scared of this sewing pattern (McCalls: M7475). I have never made pants before, and zippers are my biggest enemy, so the zipper fly was terrifying. I also struggled with the yoke back. It was coming out a little lopsided, and I had to redo the top stitching a couple times.If I could go back and choose a different pattern, I would get one without a yoke. Despite all that, the pattern turned out to be pretty easy so it went a lot smoother then I expected. I had to make a few adjustments though (as is to be expected). They came out slightly too wide and waaay too long, so I cut the length about a foot shorter then the pattern indicated.

I hate having to take things to the tailor unless its for a special occasion, so if you're like me, but don't want to construct a whole pair, it can be really simple to DIY a shorter hem. If you have basic sewing skills, you can certainly just cut, flip up the bottom to the inside and sew (make sure to iron the hem first!), or if you want zero sewing, you can purchase some handy hem tape and instead of sewing, iron it on to the inside of the hem you flipped up. Basically you can pin the tape so that it is half on the folded part and half above it, iron it on, and the adhesive holds your hem up (check the instructions with your hem tape). I have only used hem tape once a long time ago, so I don't remember exactly what I used, but something like this should work: Hem Tape 

I am still on the lookout for some denim culottes or cropped flares. Unfortunately, I don't think I could make my own, as I have a pretty basic sewing machine that wouldn't be able to handle the density of multiple layers of denim. So if you know of any super cropped denim, let me know!

Sunday, April 23, 2017

The Magic of a Matching Set


I love dresses, and a big part of that love is due to the one-and-done aspect of getting dressed. You pick one item of clothing and don't have to mess with color coordination or proportion issues of adding a top or bottom. One thing you do lose in a dress is the flexibility to mix and match with other items  when you're feeling less lazy (sometimes you can layer with a dress but this takes way more effort in my opinion). The answer to this conundrum? Matching sets. You already have a top and bottom that match perfectly in color and proportion, so you can throw it on without thinking about it, but you maintain the flexibility to pair each piece with different items.


I love this print... now, but it had to grow on me at first. I was originally planning on making this outfit with and black and white gingham, but I couldn't find it in the right check size, so I "settled" for this also linear print I found at Joann's. I am amazingly happy with it though, this was just the print I needed. I made the top using  pattern M6968 (it is out of print, but you can find it on Etsy or Ebay). I had to make a few adjustments because it originally came out too big, and when I make it again, I plan to make the darts extend higher as the bust area is still a little too roomy. For the skirt, I just made a simple circle skirt. I intended to make it a flat waistband with a zipper but I cut the center circle too big, so I used elastic instead. There are so many circle skirt tutorials, no need for me to reinvent the wheel. Here is a good one on Merrick's Art.

Don't want to DIY? I linked similar sets at the end of this post.

For more casual days, extra windy weather, or activities that just don't allow for a skirt, the top easily pairs with some high waisted cut offs, or pants. My favorite is to wear it with these high waisted Levi shorts and vintage leather belt (thanks mom ).


Having so many options is especially useful if you have a regular office job. I love wearing the pieces together for a girly, fun weekend outfit, but this would not work at the office.  Fortunately, the skirt is a very work friendly piece, so I can pair it with a button up or other nice blouse for work.


Wednesday, April 5, 2017

Spring Athleisure: Sweatshirt Material Crop Top


Spring is finally here and luckily I have been busy making warm weather clothes! So last week I made a boxy tank top inspired by this top from Gap and I absolutely love it and feel great wearing it. This top is super comfy and perfect for throwing on over a sports bra or bralette.


I can't articulate exactly why, but I instantly fell in love with this top when I saw it in a Gap ad. Maybe it's how simple it is, while still maintaining some structure, or maybe because it just looks really comfy. Anyways, I have never really been able to fit into Gap clothes, so I didn't even bother trying it on. At first I thought it was made of a sweatshirt material, but it is actually just made of regular T-shirt material. I decided to stick with the initial idea of a sweatshirt material, as it would give it more structure.


Not into DIY? Skip ahead to the bottom for some similar styles you can buy.

This was a simple top to put together, since it is boxy by design, no need to worry about a perfect fit. I already had a similar top that I used as a pattern, but really any loose fitting T-shirt or tank top will work. Fold the pattern top in half so that the armholes line up and place it on the fold of your fabric. I used tailor chalk, which easily comes out, to outline the pattern. Make sure to draw your line/cut about a half inch bigger then your pattern, this is a seam allowance so that you can sew the edges without making it smaller then you intended. After you cut it out, place the cut piece on the fold and cut out a second piece. This will be the front and back. Your outline should roughly look like the picture below.

Roughly measure the armholes and neck opening to determine how much edging you will need. I cut 29 inches for the neck and 20 inches for each arm (I ended up having a lot of excess length, but better too much then too little). Cut out one piece of edging for the neck, and one for each armhole, the respective lengths that you measured and 2 1/2 inches wide. Now you have all your pieces cut out.

First, with right sides together (the side of the fabric you want to show) sew together the front and back pieces at the top of the shoulder, then on each side under the curve of the armhole. These seems are shown in red in the picture below. Iron the seams open, they can look a little puffy when you first sew them, so it will look a lot better after being ironed. Try it on to make sure it roughly fits the way you want it.  If not make any adjustments now. The fit will end up being a little shorter and the arm/neck holes will be a littler wider then it fits at this stage, so use a little imagination.


With all your edging pieces, fold them in half with the wrong sides together and iron them down. Then you want to pin the edging to the main piece. Put one of the right sides of the edging against the right side of the main piece and line up the end of the edging with one of the seems you already sewed on the main piece. On the neck this will be one of the side edges, and on the armholes you will want to line it up with the underarm seam. When pining the edging make sure to leave a little piece extra at the beginning. You will need to sew together the two end pieces of edging later. Sew the edging to the main piece. I made my seam 1/2 inch from the edge. When you finish, sew together the ends of each edging together so it creates the closed loop around each hole. Make sure to iron the new seams and trim the excess material.


Now you just need hem the bottom. Simply fold the bottom underneath so that wrong sides are together. I did about a 1/2 inch seam. Iron and you are all done!

Gap (Original Inspiration)
Forever 21
American Eagle