Labels

Sunday, April 23, 2017

The Magic of a Matching Set


I love dresses, and a big part of that love is due to the one-and-done aspect of getting dressed. You pick one item of clothing and don't have to mess with color coordination or proportion issues of adding a top or bottom. One thing you do lose in a dress is the flexibility to mix and match with other items  when you're feeling less lazy (sometimes you can layer with a dress but this takes way more effort in my opinion). The answer to this conundrum? Matching sets. You already have a top and bottom that match perfectly in color and proportion, so you can throw it on without thinking about it, but you maintain the flexibility to pair each piece with different items.


I love this print... now, but it had to grow on me at first. I was originally planning on making this outfit with and black and white gingham, but I couldn't find it in the right check size, so I "settled" for this also linear print I found at Joann's. I am amazingly happy with it though, this was just the print I needed. I made the top using  pattern M6968 (it is out of print, but you can find it on Etsy or Ebay). I had to make a few adjustments because it originally came out too big, and when I make it again, I plan to make the darts extend higher as the bust area is still a little too roomy. For the skirt, I just made a simple circle skirt. I intended to make it a flat waistband with a zipper but I cut the center circle too big, so I used elastic instead. There are so many circle skirt tutorials, no need for me to reinvent the wheel. Here is a good one on Merrick's Art.

Don't want to DIY? I linked similar sets at the end of this post.

For more casual days, extra windy weather, or activities that just don't allow for a skirt, the top easily pairs with some high waisted cut offs, or pants. My favorite is to wear it with these high waisted Levi shorts and vintage leather belt (thanks mom ).


Having so many options is especially useful if you have a regular office job. I love wearing the pieces together for a girly, fun weekend outfit, but this would not work at the office.  Fortunately, the skirt is a very work friendly piece, so I can pair it with a button up or other nice blouse for work.


Wednesday, April 5, 2017

Spring Athleisure: Sweatshirt Material Crop Top


Spring is finally here and luckily I have been busy making warm weather clothes! So last week I made a boxy tank top inspired by this top from Gap and I absolutely love it and feel great wearing it. This top is super comfy and perfect for throwing on over a sports bra or bralette.


I can't articulate exactly why, but I instantly fell in love with this top when I saw it in a Gap ad. Maybe it's how simple it is, while still maintaining some structure, or maybe because it just looks really comfy. Anyways, I have never really been able to fit into Gap clothes, so I didn't even bother trying it on. At first I thought it was made of a sweatshirt material, but it is actually just made of regular T-shirt material. I decided to stick with the initial idea of a sweatshirt material, as it would give it more structure.


Not into DIY? Skip ahead to the bottom for some similar styles you can buy.

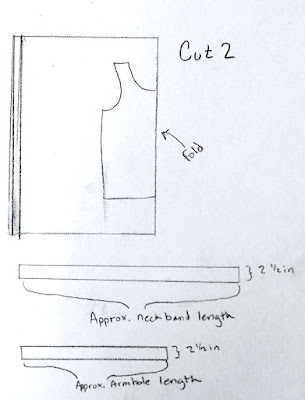
This was a simple top to put together, since it is boxy by design, no need to worry about a perfect fit. I already had a similar top that I used as a pattern, but really any loose fitting T-shirt or tank top will work. Fold the pattern top in half so that the armholes line up and place it on the fold of your fabric. I used tailor chalk, which easily comes out, to outline the pattern. Make sure to draw your line/cut about a half inch bigger then your pattern, this is a seam allowance so that you can sew the edges without making it smaller then you intended. After you cut it out, place the cut piece on the fold and cut out a second piece. This will be the front and back. Your outline should roughly look like the picture below.

Roughly measure the armholes and neck opening to determine how much edging you will need. I cut 29 inches for the neck and 20 inches for each arm (I ended up having a lot of excess length, but better too much then too little). Cut out one piece of edging for the neck, and one for each armhole, the respective lengths that you measured and 2 1/2 inches wide. Now you have all your pieces cut out.

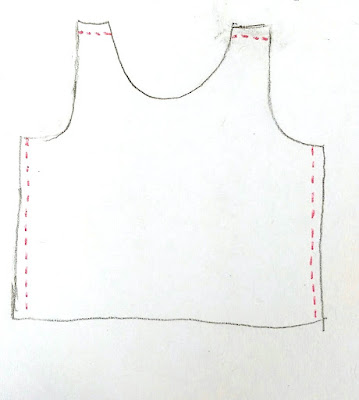
First, with right sides together (the side of the fabric you want to show) sew together the front and back pieces at the top of the shoulder, then on each side under the curve of the armhole. These seems are shown in red in the picture below. Iron the seams open, they can look a little puffy when you first sew them, so it will look a lot better after being ironed. Try it on to make sure it roughly fits the way you want it.  If not make any adjustments now. The fit will end up being a little shorter and the arm/neck holes will be a littler wider then it fits at this stage, so use a little imagination.


With all your edging pieces, fold them in half with the wrong sides together and iron them down. Then you want to pin the edging to the main piece. Put one of the right sides of the edging against the right side of the main piece and line up the end of the edging with one of the seems you already sewed on the main piece. On the neck this will be one of the side edges, and on the armholes you will want to line it up with the underarm seam. When pining the edging make sure to leave a little piece extra at the beginning. You will need to sew together the two end pieces of edging later. Sew the edging to the main piece. I made my seam 1/2 inch from the edge. When you finish, sew together the ends of each edging together so it creates the closed loop around each hole. Make sure to iron the new seams and trim the excess material.


Now you just need hem the bottom. Simply fold the bottom underneath so that wrong sides are together. I did about a 1/2 inch seam. Iron and you are all done!

Gap (Original Inspiration)
Forever 21
American Eagle